Configuration Files for Shield
ByteHide Shield uses a single, standardized configuration file format across all integration methods. Whether you're using Visual Studio, MSBuild, CLI, or any other integration, the configuration structure remains the same.
The same configuration file works with all ByteHide Shield integration methods:
- NuGet package integration
- Visual Studio extension
- CLI tools
- Unity integration
File Naming and Location
Shield configuration files are project-specific, meaning each project (.csproj) in your solution requires its own configuration file. This allows precise control over protection settings for each component of your application.
Shield automatically locates configuration files with the following naming patterns:
shield.config.json- Default configuration file for a single projectshield.{custom}.config.json- Project-specific configuration file when you have multiple options
Place the configuration file in the root directory of each project, and Shield will automatically detect and use it during the build process.
Example Solution Structure
Here's a typical solution structure with configuration files for each project:
MySolution/
│
├── MySolution.sln
│
├── ProjectA/
│   ├── ProjectA.csproj
│   ├── shield.config.json
│   └── [project files...]
│
├── ProjectB/
│   ├── ProjectB.csproj
│   ├── shield.config.json (or shield.onpremise.config.json)
│   └── [project files...]
│
└── ProjectC/
    ├── ProjectC.csproj
    ├── shield.release.config.json
    ├── shield.debug.config.json
    └── [project files...]
MySolution/
│
├── MySolution.sln
│
├── ProjectA/
│ ├── ProjectA.csproj
│ ├── shield.config.json
│ └── [project files...]
│
├── ProjectB/
│ ├── ProjectB.csproj
│ ├── shield.config.json (or shield.onpremise.config.json)
│ └── [project files...]
│
└── ProjectC/
├── ProjectC.csproj
├── shield.release.config.json
├── shield.debug.config.json
└── [project files...]Each project directory contains its own Shield configuration file, allowing you to:
- Apply different protection settings to each project
- Configure project-specific signing requirements
- Enable different protections based on each project's needs
Shield will automatically find and apply the appropriate configuration during the build process of each project.
Configuration Structure
Shield configuration files use JSON format with a clear hierarchical structure. Here's a basic example:
{
  "Name": "MyAppProtection",
  "Preset": "custom",
  "ProjectToken": "your-project-token-here",
  "Enabled": true,
  "Protections": {
    "rename": {
      "rename public": true,
      "mode": "letters"
    },
    "control_flow_advance": {}
  }
}
{
"Name": "MyAppProtection",
"Preset": "custom",
"ProjectToken": "your-project-token-here",
"Enabled": true,
"Protections": {
"rename": {
"rename public": true,
"mode": "letters"
},
"control_flow_advance": {}
}
}Configuration Properties
| Property | Type | Description | Default |
|---|---|---|---|
Name | string | An internal identifier used in logs to identify which configuration was loaded. Can be any string that helps you identify this configuration. | |
Preset | string | Protection preset: "maximum", "balance", "optimized", or "custom" | |
ProjectToken | string | Your ByteHide project token | |
ProtectionSecret | string | Custom password used for debugging protected applications and decoding obfuscated stack traces. If not specified, a random one is generated. Can be omitted if you don't need to debug or analyze obfuscated stack traces. | |
ThrowOnError | boolean | When true, Shield will break the build if protection fails. When false, compilation will continue even if Shield protection fails. | true |
RunConfiguration | string | Specifies which build configuration(s) will trigger protection. Must match Visual Studio/.NET build configurations (e.g., "Debug", "Release"). Use "*" to always protect regardless of configuration. | "Release" |
Enabled | boolean | Toggle protection on/off | true |
ReplaceOutput | boolean | Replace original assembly with protected one | true |
OutputPath | string | Custom output path for protected assembly | |
CopyMagicKey | boolean | Copy magic key after protection | false |
Security Warning
For public build environments (like CI/CD pipelines), we strongly recommend not including your project token in the configuration file. Instead, use the environment variable BYTEHIDE_SHIELD_TOKEN to provide your token securely.
This approach prevents your token from being exposed in source code repositories and build logs:
# For Windows
set BYTEHIDE_SHIELD_TOKEN=your-token-here

# For macOS/Linux
export BYTEHIDE_SHIELD_TOKEN=your-token-here
# For Windows
set BYTEHIDE_SHIELD_TOKEN=your-token-here
# For macOS/Linux
export BYTEHIDE_SHIELD_TOKEN=your-token-hereShield will automatically use the token from the environment variable if available, even if ProjectToken is not set in your configuration file.
Strong Name Signing Properties
| Property | Type | Description |
|---|---|---|
SignFilePath | string | Path to SNK file for strong name signing |
SignPublicFilePath | string | Path to public key file for strong name verification |
SignFilePassword | string | Password for SNK file if encrypted |
DelaySignature | boolean | Whether to use delay signing |
Enhanced Signing Properties
| Property | Type | Description |
|---|---|---|
SignSignatureFilePath | string | Path to signature file for enhanced signing |
SignSignaturePublicFilePath | string | Path to public signature file |
SignSignaturePassword | string | Password for signature file if encrypted |
Protection Presets
Shield offers three predefined protection configurations:
Maximum (
"Preset": "maximum") - Highest security level, applying all available protections with aggressive settings. Prioritizes security over performance.Balance (
"Preset": "balance") - Recommended for most applications. Provides strong security while maintaining reasonable performance.Optimized (
"Preset": "optimized") - Focuses on performance while still providing solid protection. Best for performance-critical applications.Custom (
"Preset": "custom") - Define your own protection configuration using theProtectionsproperty.
Configuring Protections
The Protections property lets you customize individual protections:
"Protections": {
  "rename": {
    "rename public": true,
    "rename arguments": false,
    "mode": "letters"
  },
  "control_flow_advance": {
    "invalid code": false,
    "operations": "arithmetic|logic|conversion"
  },
  "anti_debug": {}
}"Protections": {
"rename": {
"rename public": true,
"rename arguments": false,
"mode": "letters"
},
"control_flow_advance": {
"invalid code": false,
"operations": "arithmetic|logic|conversion"
},
"anti_debug": {}
}Enabling a Protection Without Configuration
To enable a protection without specific configuration, use an empty object or null:
"Protections": {
  "anti_debug": {},  // or
  "anti_dump": null
}"Protections": {
"anti_debug": {}, // or
"anti_dump": null
}Configuring Protection Parameters
To customize a protection, specify its parameters as key-value pairs:
"rename": {
  "rename public": true,
  "rename arguments": false,
  "mode": "letters"
}"rename": {
"rename public": true,
"rename arguments": false,
"mode": "letters"
}Each protection has different configuration parameters. Check the documentation for each protection to see available options.
Complete Configuration Example
Here's a more comprehensive example:
{
  "Name": "Production_Configuration",
  "Preset": "custom",
  "ProjectToken": "your-project-token-here",
  "ProtectionSecret": "MyApp1234",
  "RunConfiguration": "*",
  "Enabled": true,
  "SignFilePath": "path/to/key.snk",
  "Protections": {
    "rename": {
      "rename public": true,
      "rename arguments": true,
      "mode": "letters"
    },
    "constants_advance": {},
    "constants_mutation": {
      "invalid code": false,
      "operations": "arithmetic|logic|conversion"
    },
    "anti_debug": {},
    "anti_dump": {},
    "resources": {
      "compress": true,
      "encrypt": true
    }
  }
}
{
"Name": "Production_Configuration",
"Preset": "custom",
"ProjectToken": "your-project-token-here",
"ProtectionSecret": "MyApp1234",
"RunConfiguration": "*",
"Enabled": true,
"SignFilePath": "path/to/key.snk",
"Protections": {
"rename": {
"rename public": true,
"rename arguments": true,
"mode": "letters"
},
"constants_advance": {},
"constants_mutation": {
"invalid code": false,
"operations": "arithmetic|logic|conversion"
},
"anti_debug": {},
"anti_dump": {},
"resources": {
"compress": true,
"encrypt": true
}
}
}Cloud Configuration Playground
ByteHide Cloud provides an interactive configuration playground that helps you generate Shield configuration files for your projects.
The cloud configuration playground allows you to:
- Visually create and customize Shield configurations
- Select protection presets and individual protections
- Generate and download configuration JSON files
- Create different configurations for various project needs
Accessing the Configuration Playground
You can access the Shield configuration playground by:
- Logging into your ByteHide account at bytehide.com
- Selecting your project from the dashboard
- Navigating to the Shield product section
- Selecting the Workflow tab
Creating Configurations in the Cloud
The playground interface provides an intuitive visual editor similar to the one shown below:
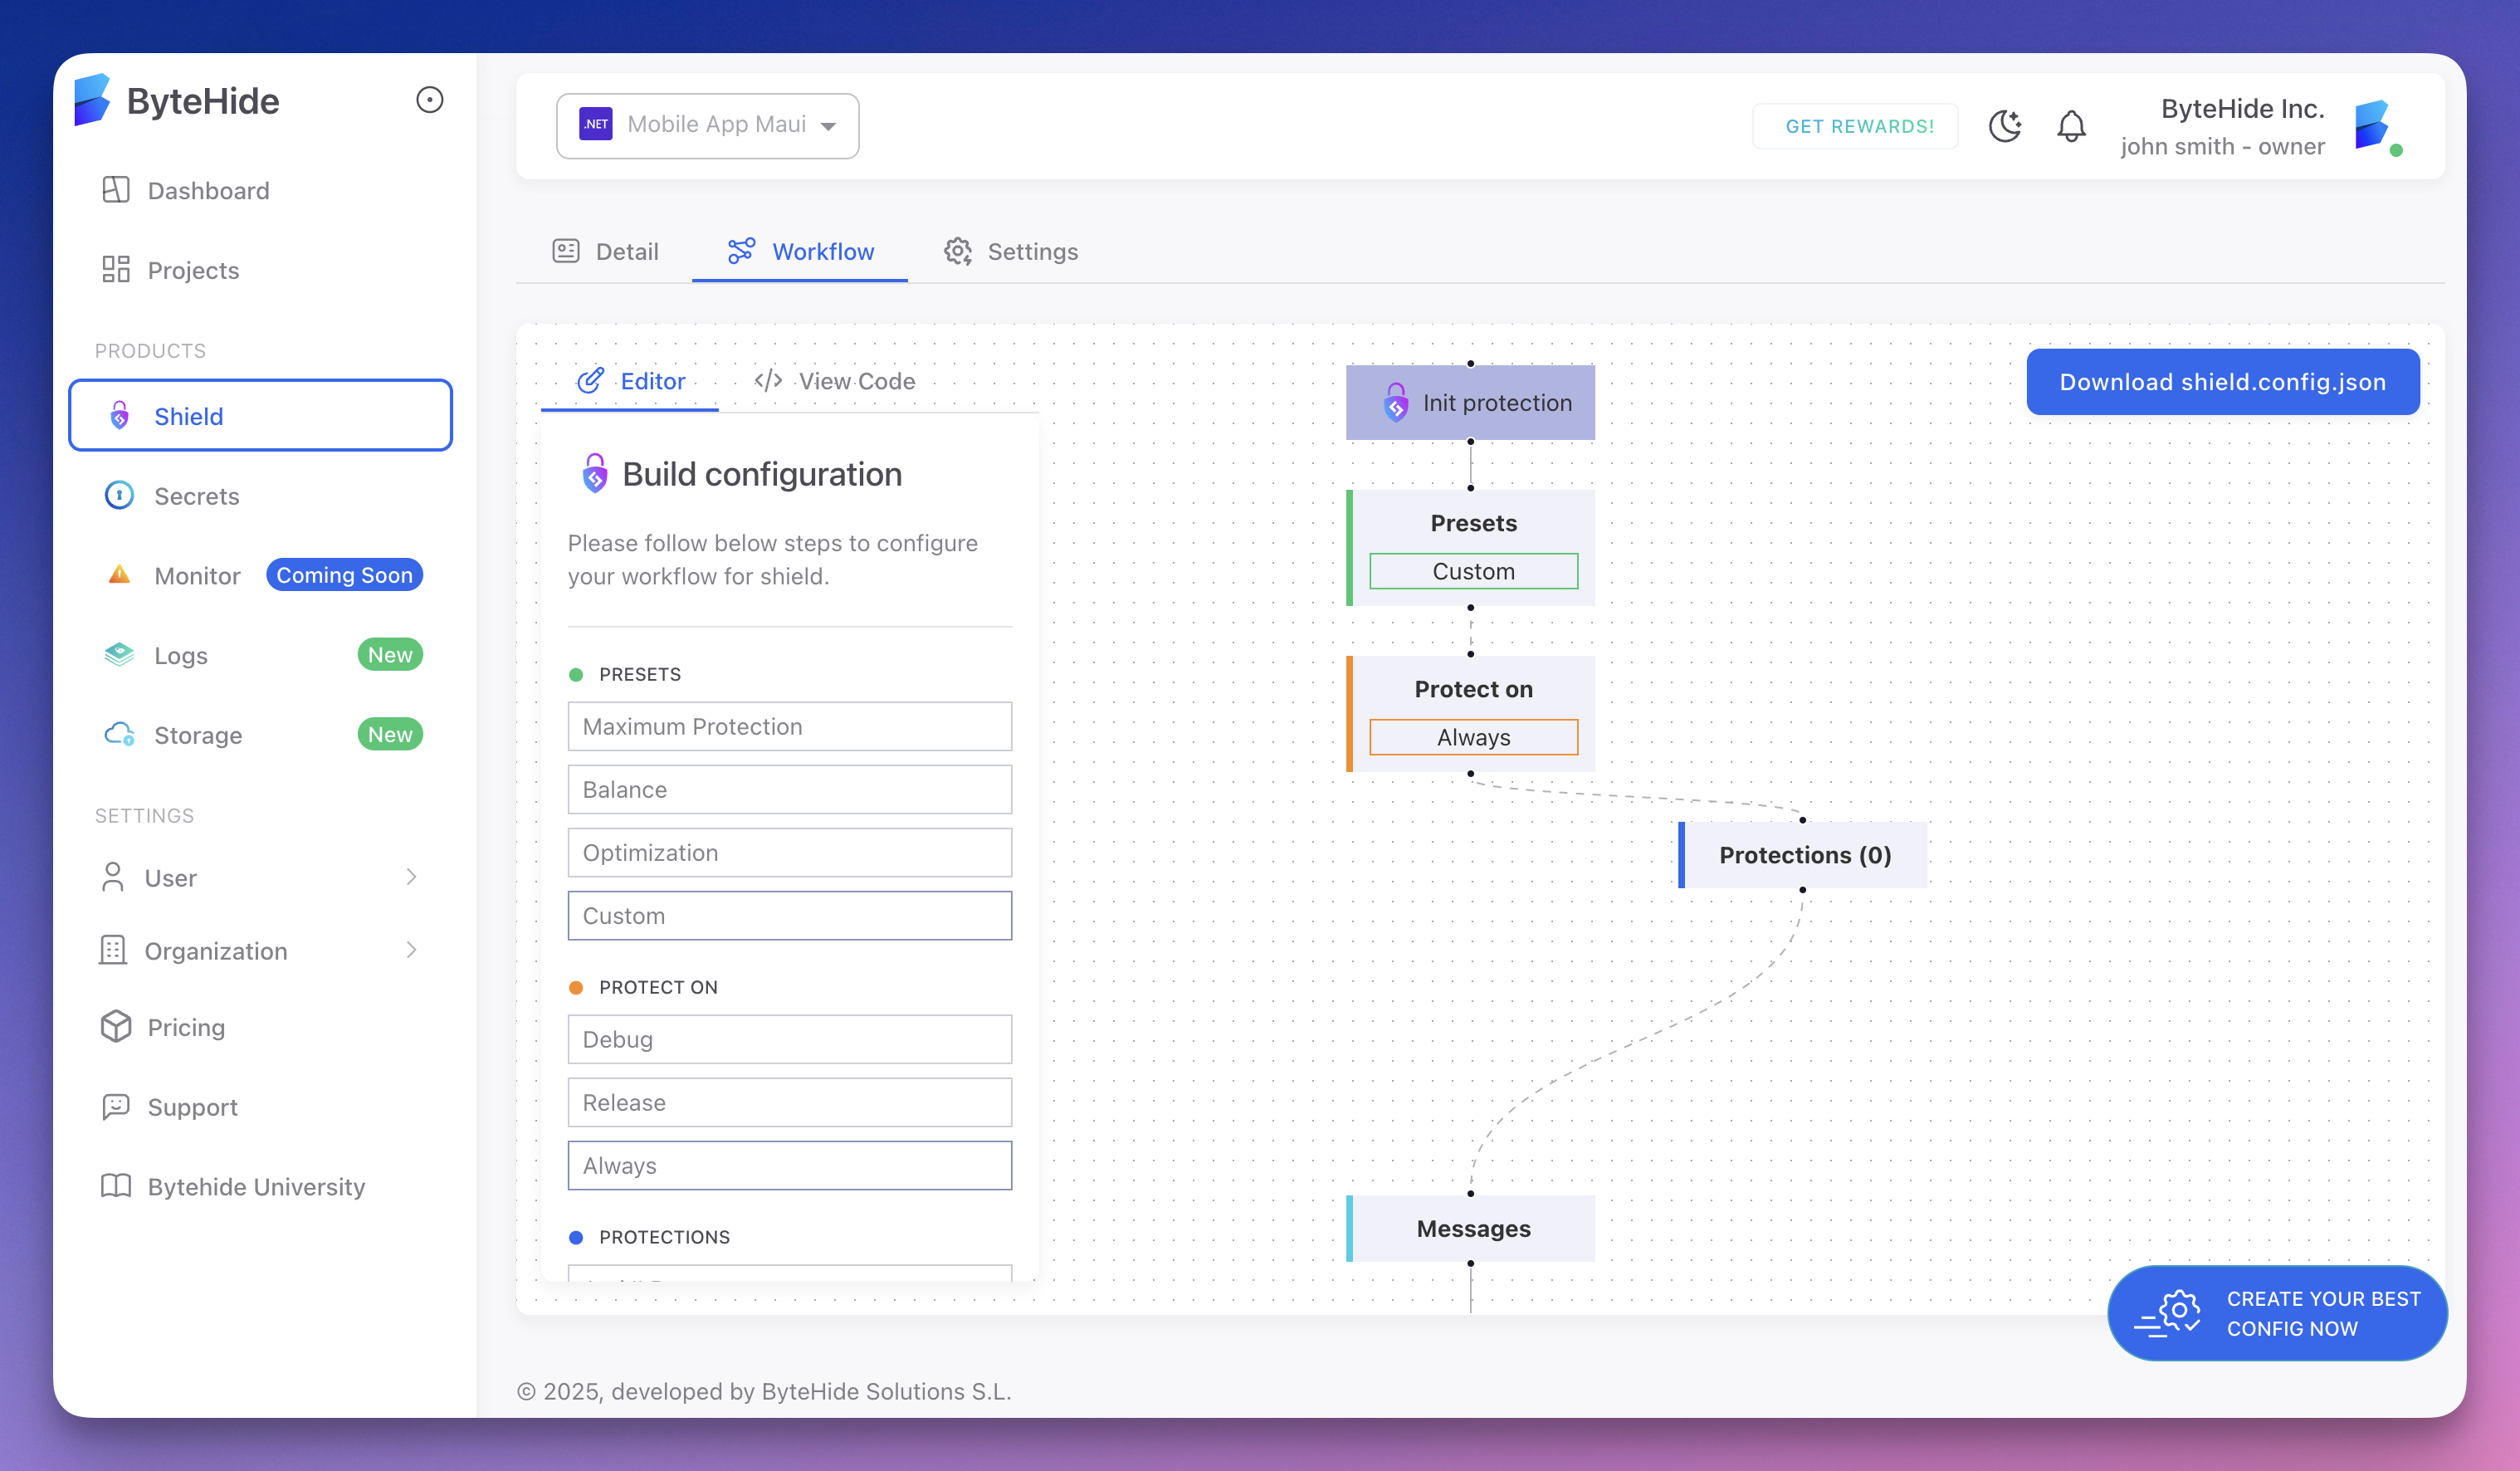 Click to expand
From this interface, you can:
- Select protection presets (Maximum, Balance, Optimized)
- Configure individual protections and their parameters
- Preview the generated JSON configuration
- Download the complete configuration file
Managing Multiple Configuration Files
Since .NET projects often contain multiple assemblies (DLLs) that may require different protection strategies, you'll need to:
- Generate separate configuration files for each assembly that needs distinct protection settings
- Download each configuration file
- Place them in the appropriate project directories within your solution
This approach gives you flexibility to apply different protection strategies to different components of your application while still leveraging the convenience of the cloud playground for configuration generation.
Configuration Playground
Create your own configuration file easily with our interactive playground:
For public build environments, use the BYTEHIDE_SHIELD_TOKEN environment variable instead.
Used for debugging protected applications. Leave empty to generate randomly.
When Shield should run. Use "*" to always protect.
Protections (14)
In-use (0)
null