Multi-Environment Setup
Environment isolation
ByteHide Secrets allows you to store different values for the same secret key across multiple environments. This ensures proper isolation between development, staging, and production configurations.
Understanding Environments
Environments allow you to manage separate sets of secrets for different stages of your application lifecycle:
- Development: Used during local development
- Staging: For testing before production deployment
- Production: For your live application
- Custom environments: Create any custom environment you need
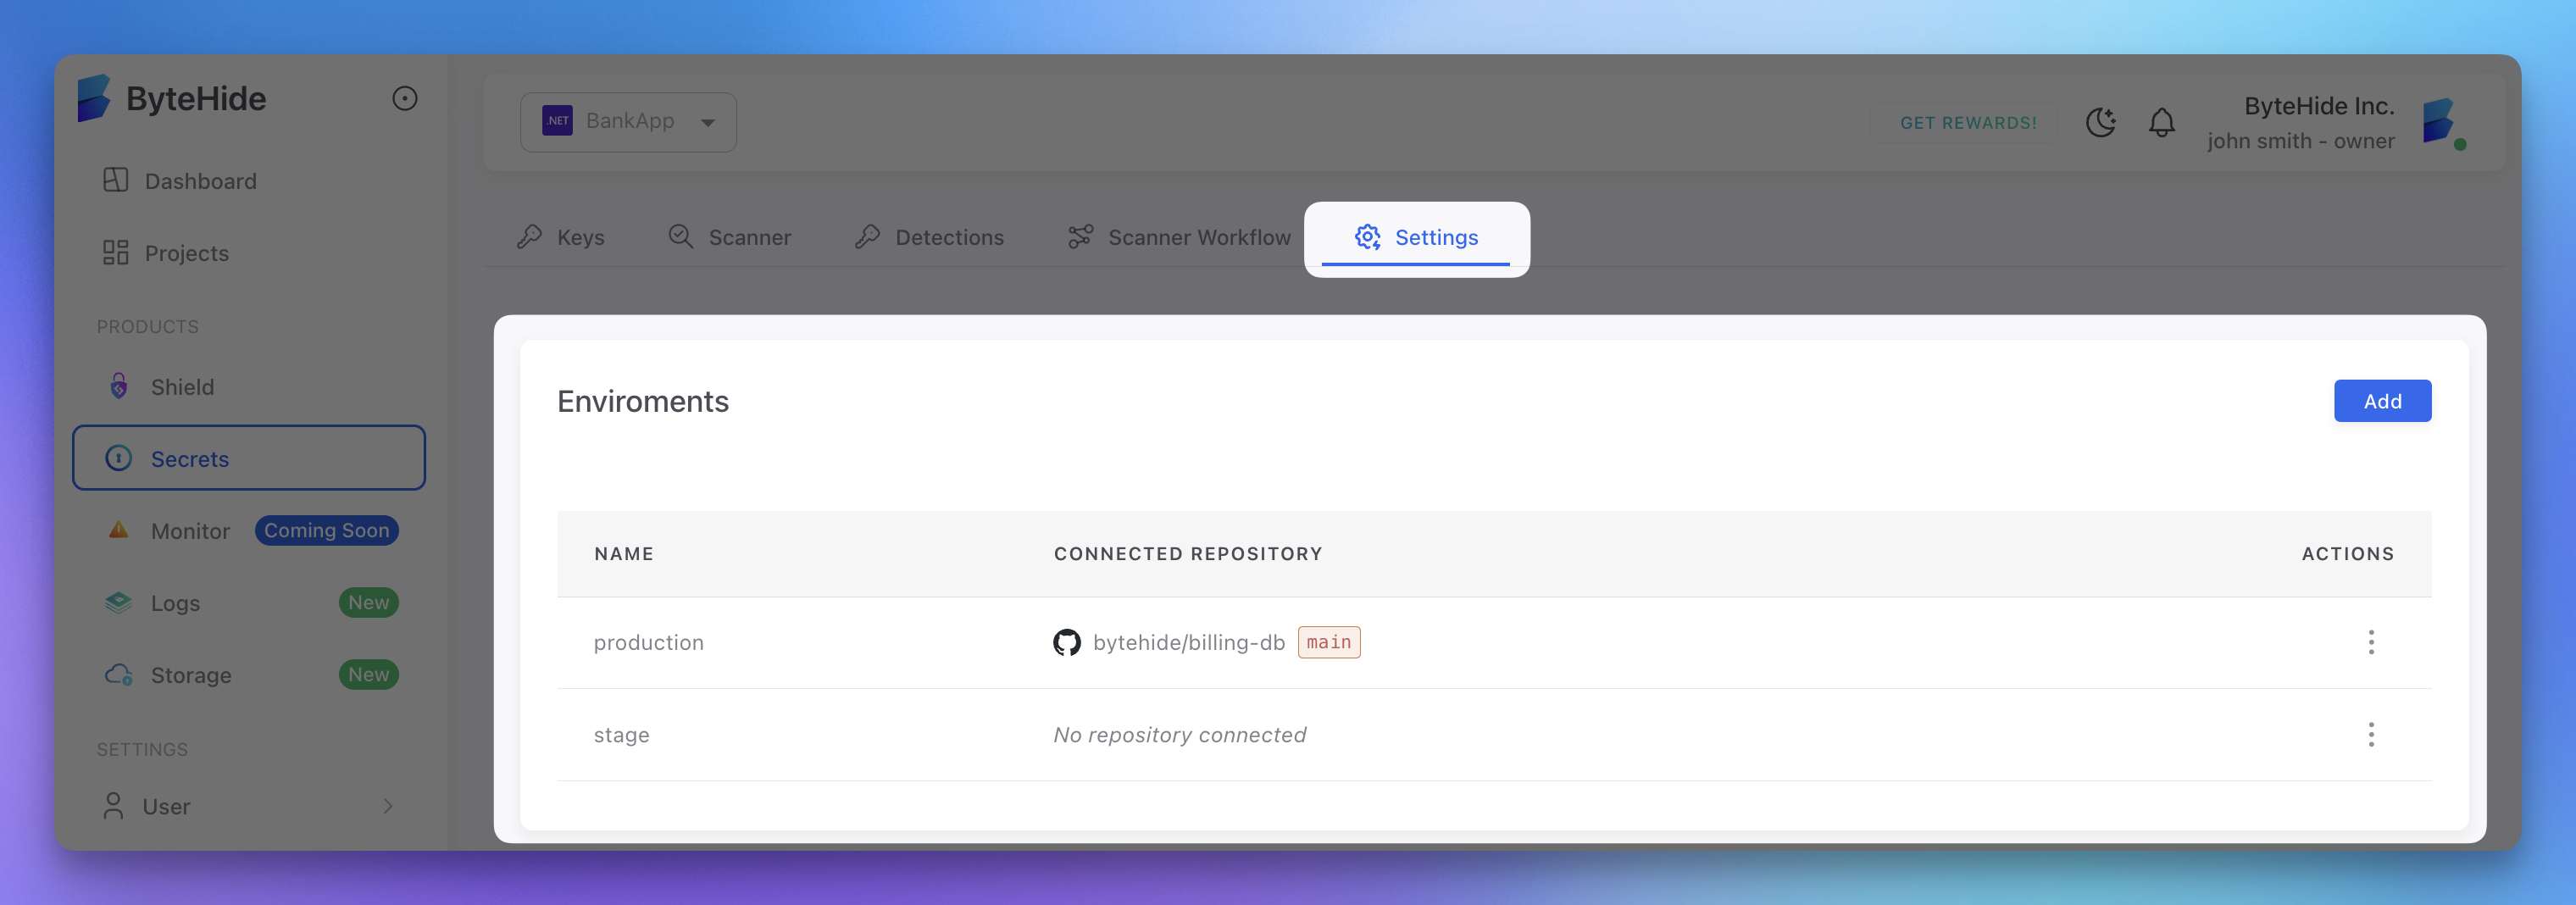
Creating Environments
Environments are created in the ByteHide cloud panel:
- Navigate to your project
- Go to the Settings tab
- In the Environments section, click Add
- Enter a name for your environment (e.g., "staging")
- Optionally connect a repository to this environment
- Click Save
 Click to expand
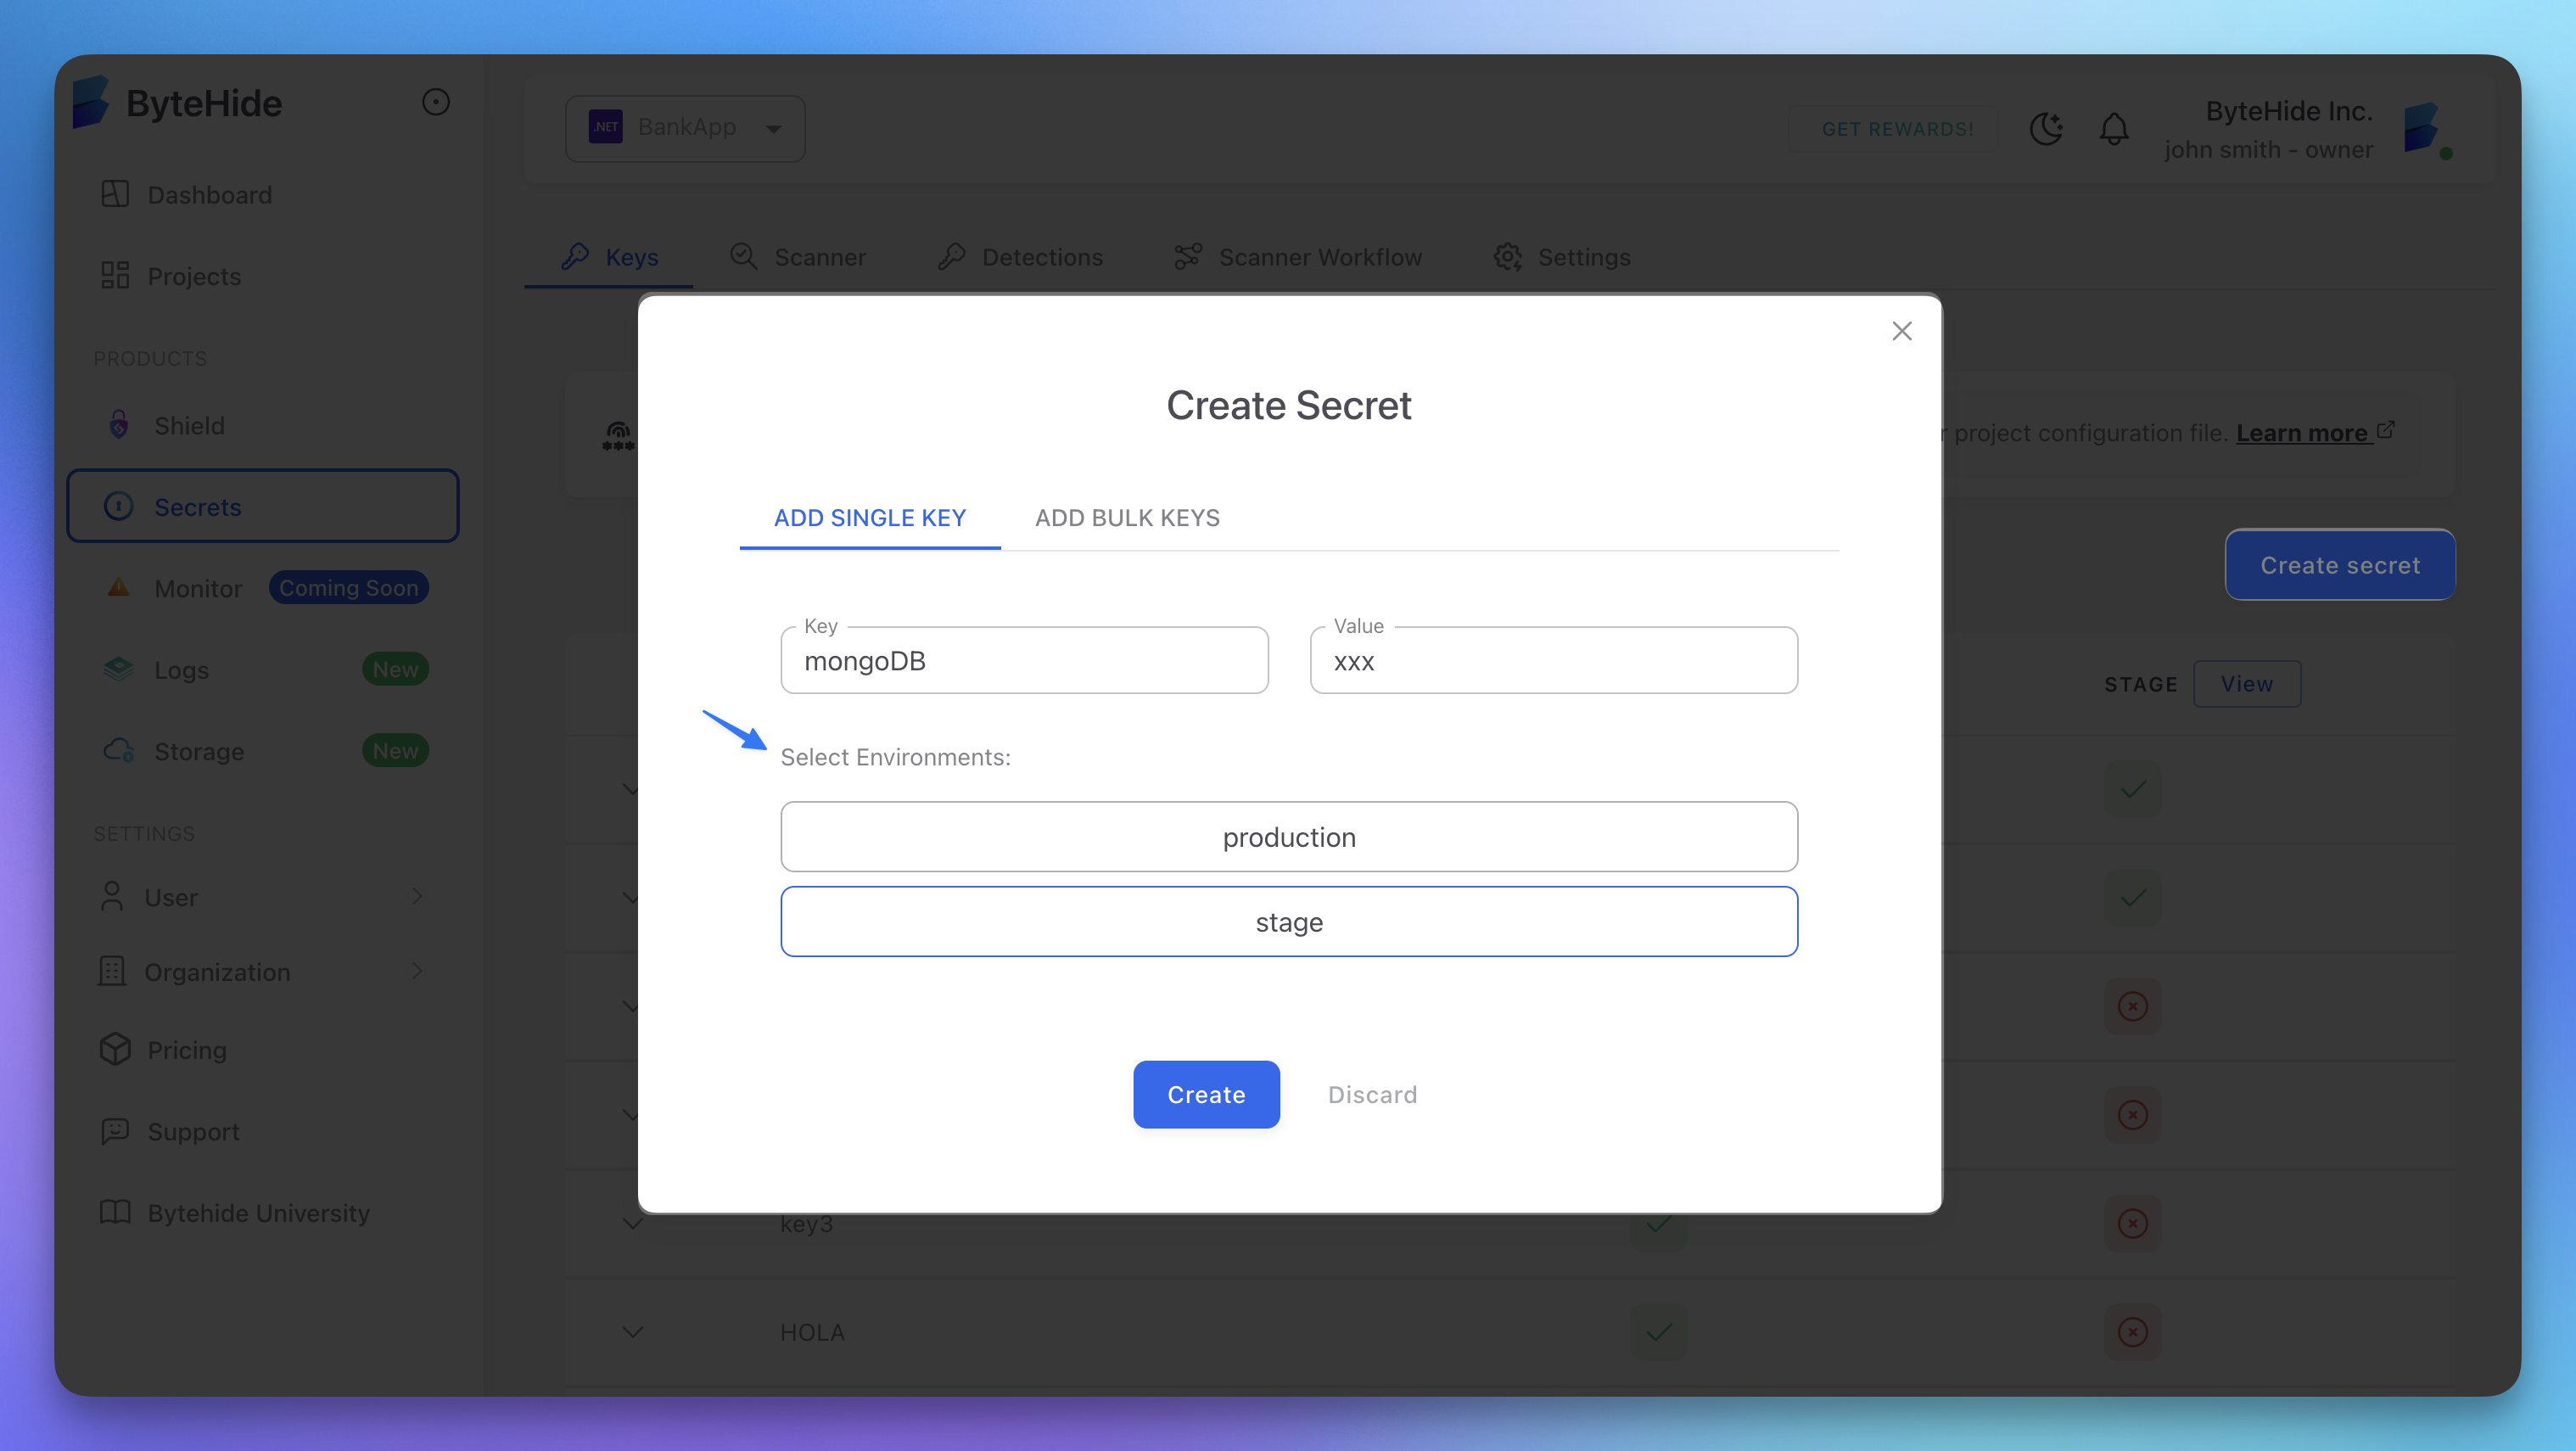
Setting Environment-Specific Secrets
Once you've created environments, you can set environment-specific values for each secret key:
- Go to the Keys tab in your project
- Click Create secret to add a new secret
- Enter a key name (e.g., "database-connection")
- Add values for each environment
- Click Save
 Click to expand
Accessing Environment-Specific Secrets
Set Environment at Initialization
The most common approach is to set the environment via environment variables:
<?php

use ByteHide\Secrets\SecretsManager;

// Set environment via environment variable
// BYTEHIDE_SECRETS_ENVIRONMENT=production

// Auto-initializes from environment variables
$connectionString = SecretsManager::get('database-connection'); // Gets production value
<?php
use ByteHide\Secrets\SecretsManager;
// Set environment via environment variable
// BYTEHIDE_SECRETS_ENVIRONMENT=production
// Auto-initializes from environment variables
$connectionString = SecretsManager::get('database-connection'); // Gets production valueOr directly for testing/development:
<?php

use ByteHide\Secrets\SecretsManager;

// Initialize with explicit credentials (not recommended for production)
SecretsManager::unsecureInitialize('your-token', 'production');

// Now all secret requests will use "production" environment
$connectionString = SecretsManager::get('database-connection');
<?php
use ByteHide\Secrets\SecretsManager;
// Initialize with explicit credentials (not recommended for production)
SecretsManager::unsecureInitialize('your-token', 'production');
// Now all secret requests will use "production" environment
$connectionString = SecretsManager::get('database-connection');Environment Configuration in Different Scenarios
Local Development
# Linux/macOS
export BYTEHIDE_SECRETS_TOKEN=your-token
export BYTEHIDE_SECRETS_ENVIRONMENT=development

# Or set in PHP
putenv('BYTEHIDE_SECRETS_TOKEN=your-token');
putenv('BYTEHIDE_SECRETS_ENVIRONMENT=development');
# Linux/macOS
export BYTEHIDE_SECRETS_TOKEN=your-token
export BYTEHIDE_SECRETS_ENVIRONMENT=development
# Or set in PHP
putenv('BYTEHIDE_SECRETS_TOKEN=your-token');
putenv('BYTEHIDE_SECRETS_ENVIRONMENT=development');Laravel Application
In your .env file:
BYTEHIDE_SECRETS_TOKEN=your-token
BYTEHIDE_SECRETS_ENVIRONMENT=development
BYTEHIDE_SECRETS_TOKEN=your-token
BYTEHIDE_SECRETS_ENVIRONMENT=developmentLaravel automatically loads .env variables, making them available to the ByteHide SDK.
CI/CD Pipeline
In your CI/CD workflows, set the appropriate environment:
# GitHub Actions example
jobs:
  deploy:
    runs-on: ubuntu-latest
    steps:
      # ...
      - name: Set ByteHide Environment
        run: |
          # For staging branch
          if [[ "${{ github.ref }}" == "refs/heads/develop" ]]; then
            echo "BYTEHIDE_SECRETS_ENVIRONMENT=staging" >> $GITHUB_ENV
          # For main branch
          elif [[ "${{ github.ref }}" == "refs/heads/main" ]]; then
            echo "BYTEHIDE_SECRETS_ENVIRONMENT=production" >> $GITHUB_ENV
          else
            echo "BYTEHIDE_SECRETS_ENVIRONMENT=development" >> $GITHUB_ENV
          fi
# GitHub Actions example
jobs:
deploy:
runs-on: ubuntu-latest
steps:
# ...
- name: Set ByteHide Environment
run: |
# For staging branch
if [[ "${{ github.ref }}" == "refs/heads/develop" ]]; then
echo "BYTEHIDE_SECRETS_ENVIRONMENT=staging" >> $GITHUB_ENV
# For main branch
elif [[ "${{ github.ref }}" == "refs/heads/main" ]]; then
echo "BYTEHIDE_SECRETS_ENVIRONMENT=production" >> $GITHUB_ENV
else
echo "BYTEHIDE_SECRETS_ENVIRONMENT=development" >> $GITHUB_ENV
fiBest Practices
Environment Naming Convention
Use consistent environment names across your organization:
development(ordev)testing(ortest)staging(orstg)production(orprod)
Value Consistency
Maintain the same key structure across environments with different values:
api-key:
  - development: "sk_test_123"
  - staging: "sk_test_456"
  - production: "sk_live_789"
api-key:
- development: "sk_test_123"
- staging: "sk_test_456"
- production: "sk_live_789"